Porting the UZ-Framework for the KR260#
In case you don’t have access to an UltraZohm, various other evaluation kits can be used for preliminary developments. The goal of this how-to is to port the existing UltraZohm project to the KR260 board to create a small HiL environment for the first tests. Based on the getting-started guide, the same workflow is used. First, a suitable hardware design is created in Vivado, the required information is exported to Vitis, and then the UltraZohm project is created. Subsequently, minor changes are made to the source files, and the software is started on the KR260. This is the starting point for small HiL/SiL/PiL projects, which are compatible with the main UltraZohm project.
Note
This how-to is a good start for porting the UZ-Framework for other evaluation kits, but this requires some knowledge about the tools and the board, the workflow and a general overview of how SoC systems work.
Note
In the current state, with this how-to you can create your UZ port for the KR260. This will do the job, but there are still some open issues and some space for improvements!
Prerequisites#
Vivado#
To get the UltraZohm-Framework running on the KR260, first of all a valid Hardware-Design is needed. This can be done by creating a project from scratch or mainly using scripts.
Creating Fresh Project#
Create a fresh project in Vivado 2022.2
When you are asked for the Default Part, select Kria KR260 Robotics Starter Kit SoM
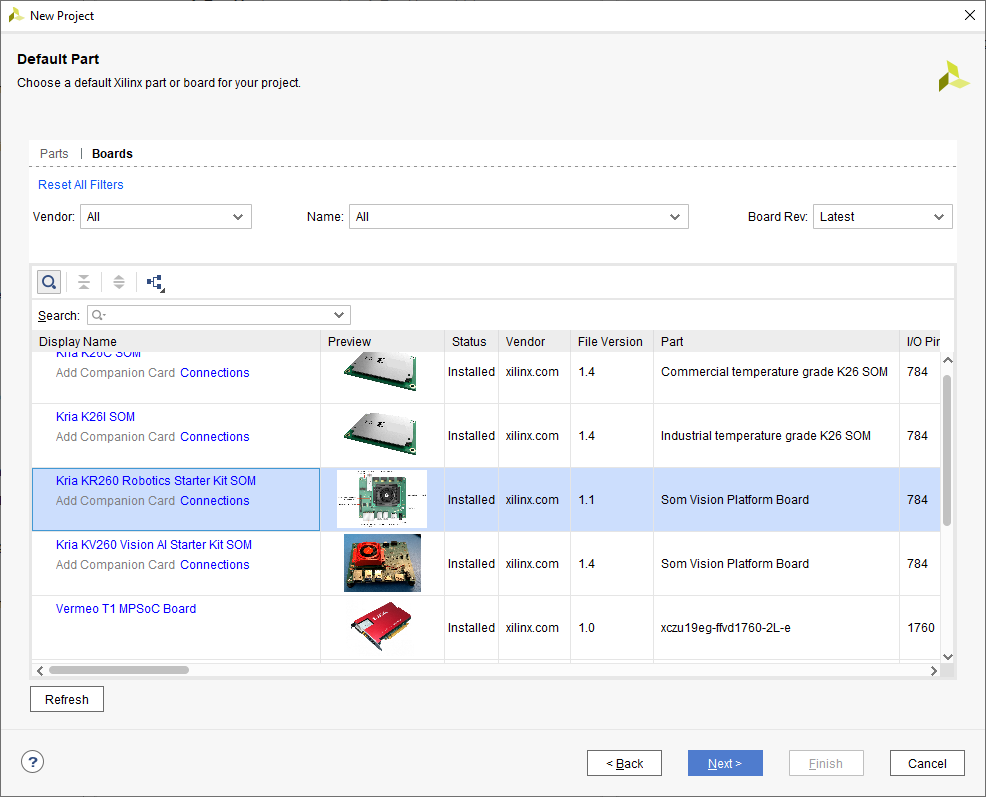
Fig. 52 Boardselection UZ-KR260.#
Add a new Block design and name it
k26sysAdd the UltraZohm IP-Repository to the project.
Tip
Settings → IP → Repository → Add → IP core folder → Select → OKAdd the IP core for the PS
Zynq UltraScale+ MPSoCto the new Block design.Click “Run Block automation” inside the green banner appearing.
Tip
This is the only point where you need automated assistant from Vivado! “Do not click to auto connection within the following Steps, otherwise Vivado is going to address the unused pins before deleting and create more problems!”
Create the HDL wrapper and make sure it is the top file.
Download the constraint file for the KR260 SoM directly from Xilinx KR260-Constraints and add the file to the project. (Link → Key Features → Design Resources → Kria K26 CCDR → KRIA K26 SoM XDC File).
Some VHDL-files have to be added manually as design sources to the Vivado-Project. Those files actually were located in
ip_cores and vivadofolders. Search forip_cores Interlock_Module_3L top_npc_state_machine.vhd
ip_cores Interlock_Module_3L npc_phase_state_machine.vhd
ip_coresDelay_signal delay_trigger.vhd
ip_cores Extend_Interrupt extend_interrupt.vhd
vivado src hdl iobufds_inst.vhd
Tip
Add sources → Add or Create design sources → Add Files → Choose the files → FinishFollowing changes to the PS are needed
- Deactivate both HP-AXI-Masterports
Re-customize IP → PS-PL Configuration → PS-PL Interfaces → Master Interface → Deactivate AXI HPM0 FPD and AXI HPM1 FPD
- Activate the LP-AXI-MasterPort
Re-customize IP → PS-PL Configuration → PS-PL Interfaces → Master Interface → Activate AXI HPM0 LPD
- Activate GEM1 on MIO38-49 with MDIO on MIO51-51
Re-customize IP → I/O Configuration → High Speed → Activate GEM1 and change I/O → Open GEM 1 → Activate MDIO1 and change I/O
- Activate I2C on MIO24-25
Re-customize IP → I/O Configuration → Low Speed → I2C → Activate I2C1 → Open I2C → Activate I2C1 and change I/O
- Activate UART1 on MIO36-37
Re-customize IP → I/O Configuration → Low Speed → UART → Activate UART1 → Open UART → Activate UART1 and change I/O
- Deactivate the second PL-Clock
Re-customize IP → Clock Configuration → Output Clocks → Low Power Domain Clocks → PL Fabric Clocks → Deactivate PL1
Tip
Use the provided Tcl script
vivado_UZ_K26_ZynqMP_PResets.tclwhen configuring the PS. This script can be used while configuring the IP core, click on the top left “Presets” and “Apply Configuration”After applying the settings for the PS, the UltraZohm-Hardware can be implemented. To accelerate the reconstruction of the whole Block-Design, there were Tcl scripts for each UZ-Hierarchy available.
kria_vivado_block_uz_user.tcl
kria_vivado_block_uz_system.tcl
kria_vivado_block_uz_analog_adapter.tcl
kria_vivado_block_digital_adapter.tcl
Create an empty hierarchy, e.g.
hier_0.Switch with the Tcl Console to the current working folder with:
cd [ get_property DIRECTORY [current_project] ]
Source the first dedicated UZ-Hierarchy-Script with:
source ../tcl_scripts/kria_vivado_block_uz_user
Create the wanted hierarchy inside
hier_0with:create_hier_cell_uz_user hier_0 uz_user
Afterward, move the freshly created hierarchy out of
hier_0one level higher and it can be used in your block design.move_bd_cells [get_bd_cells /] [get_bd_cells hier_0/uz_user]
With this script, every IP core inside the generated hierarchy is configured and connected like in the UltraZohm-main-project
For the
uz_useranduz_digital_adapter, make the placement of IP blocks using the .tcl scripts:source ../tcl_scripts/kria_vivado_block_uz_system.tcl create_hier_cell_uz_system hier_0 uz_system move_bd_cells [get_bd_cells /] [get_bd_cells hier_0/uz_system] source ../tcl_scripts/kria_vivado_block_digital_adapter.tcl create_hier_cell_uz_digital_adapter hier_0 uz_digital_adapter move_bd_cells [get_bd_cells /] [get_bd_cells hier_0/uz_digital_adapter]
Don’t recreate the
uz_analog_adaptersince we don’t have analog-Interfaces with the KR260.Delete every digital Slot inside
uz_digital_adapterexcept D1. We only want to use the 2-LvL-PWM-Cores in this How-To.Manually route the created hierarchies to the PS. Use the UltraZohm-Main-Project as a template.
Fix the remaining open Inputs of the hierarchies to constants.
Generate the Bitstream and export the .xsa as mentioned in Generate the Bitstream with Vivado
Following those steps should lead to an HW-Design like this:
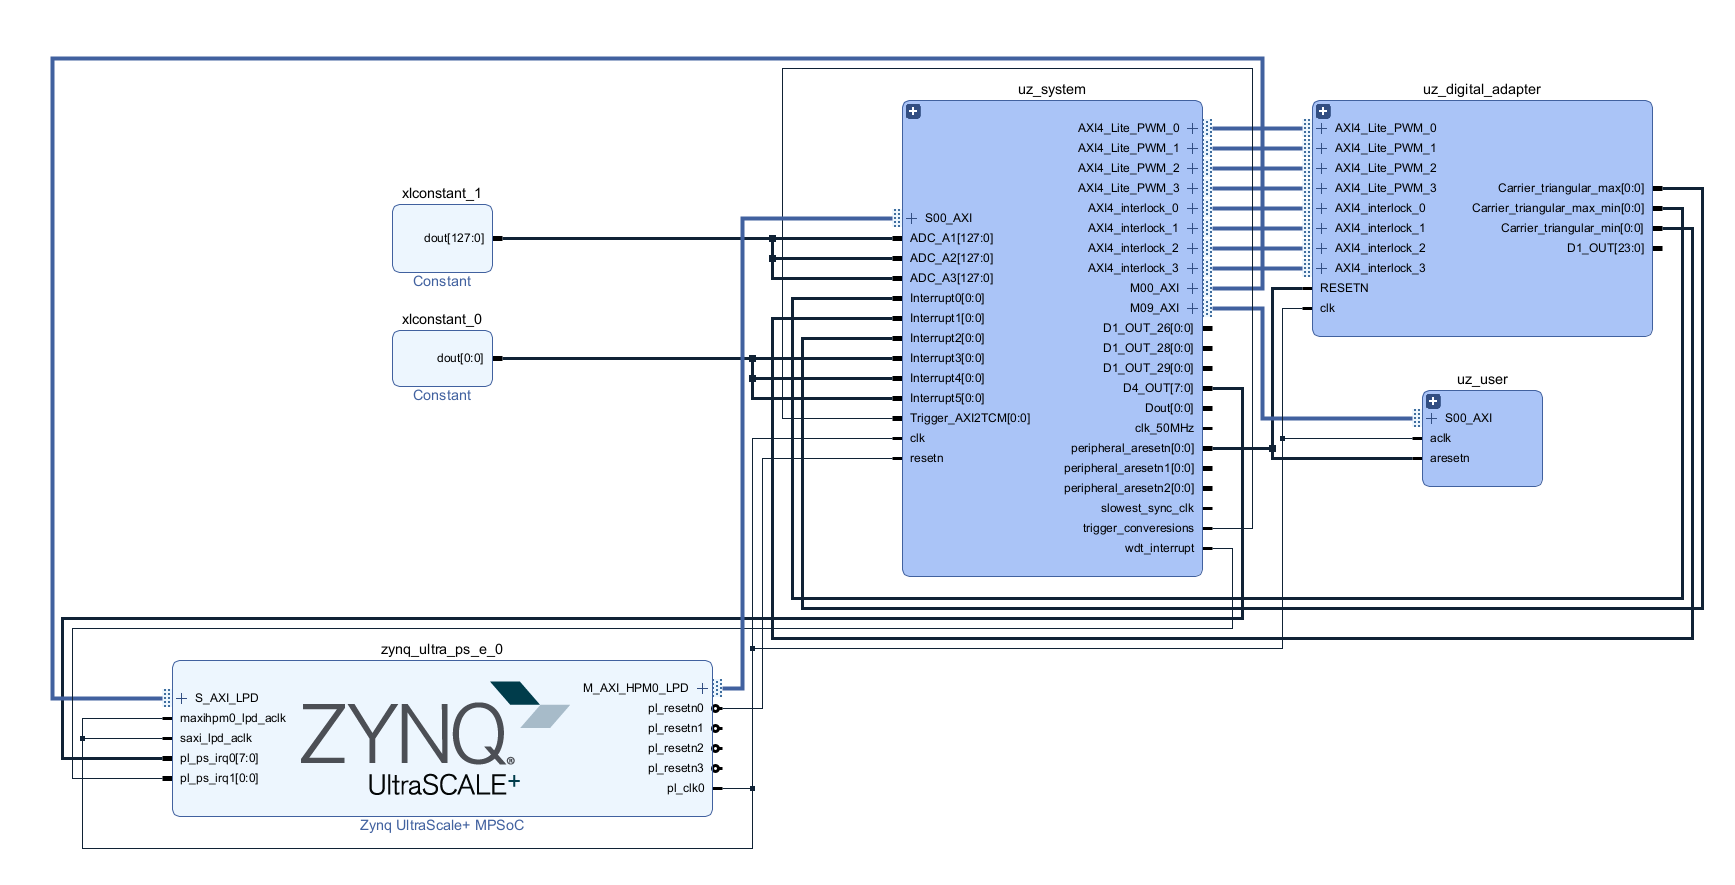
Fig. 53 Vivado-Project Hardware-Design KR260.#
Project with Tcl Scripts:#
Create a fresh project in Vivado 2022.2 with Kria KR260 Robotics Starter Kit SoM board.
Add the missing VHDL-files:
top_npc_state_machine.vhd
npc_phase_state_machine.vhd
delay_trigger.vhd
extend_interrupt.vhd
iobufds_inst.vhd
Add the UltraZohm IP-Repository to the project.
Add a new Block design and name with
k26sys.Switch with the Tcl Console to the current working folder with:
cd [ get_property DIRECTORY [current_project] ]
Open Tcl Console and call the Tcl scripts for block and connection implementation with given order:
source ../tcl_scripts/k26sys_ps_generaton.tcl
source ../tcl_scripts/k26sys_hd_generaton.tcl
Create VHDL wrapper for kr260sys and set as top manually.
With this step, you have current UltraZohm project for Kria as implemented. Generate bitstream and export. If you want to see the detailed steps, check out the tcl_scripts folder:
k26sys_ps_generation → PS
k26sys_hd_generation → IP cores, Connections
Tip
Please consider Tcl Scripts and generated flow use the ultrazohm_sw as main location, so you might need to create a folder for kria vivado project inside of ultrazohm_sw.
Generate the Bitstream and export the .xsa.
Vitis#
After creating the Hardware-Design, there were a few Software-changes necessary. This includes mainly the removed IP cores and the Frontpanel, as well as the ISR. Additionally, a small hack to the Board-Support-Package BSP must be applied to bring up the network interface.# This hack prevents a double-initiation for the PS-Files, since GEM0 uses a SGMII Interface which isn’t compatible with the used LwIP-Stack and both PHY’s for the PS-GEM’s shared the same MDIO’s.
To create a suited software for the KR260, follow these steps:
Open Vitis 2022.2 and create the Workspace according to UltraZohm Setup.
Open the XSCT Console in Vitis. Type the following commands:
cd [getws]
source {../../tcl_scripts/vitis_generate_UltraZohm_workspace.tcl}
The script WILL FAIL, but this is okay for our use case.
Clean the “UZ-Plattform-Project” and both “C-Projects”.
Open the BSP-Packages for the “FreeRTOS_domain” and “Baremetal_domain” and ensure that
stdinandstdoutpoints tops_uart_1.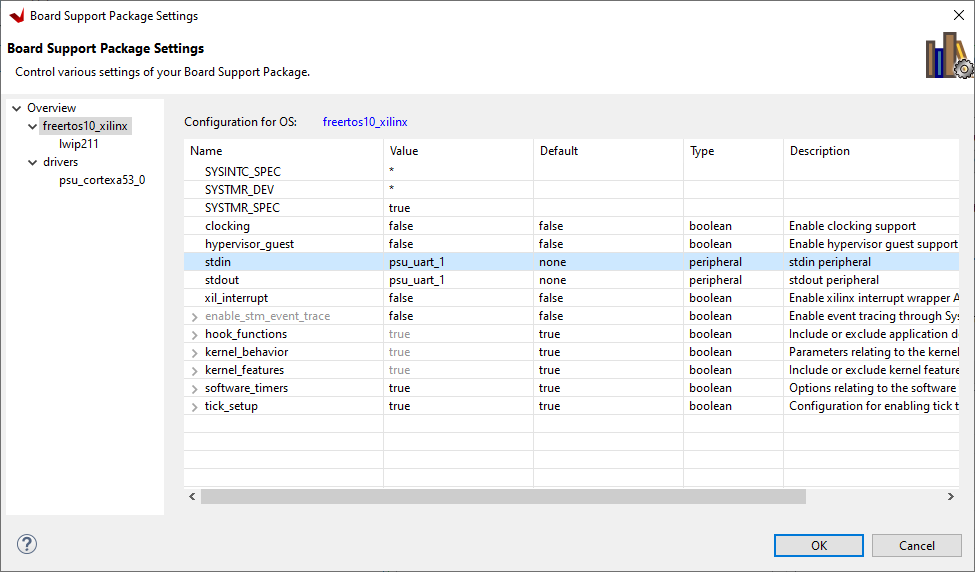
Fig. 54 Vitis BSP-Settings for KR260.#
Build the “UZ-Plattform-Project”.
Changes for the Baremetal-Project:
Addresses of dead IP cores have to be tied to a fixed address at parameter.h file. Use 0x0123456789 as address to prevent errors during compiling and ensure that those addresses never getting called!
#define XPAR_UZ_DIGITAL_ADAPTER_D5_ADAPTER_INCREENCODER_V24_IP_0_BASEADDR 0x0123456789
#define XPAR_UZ_DIGITAL_ADAPTER_D2_ADAPTER_GATES_3L_PWM_SS_3L_IP_0_BASEADDR 0x0123456789
#define XPAR_UZ_ANALOG_ADAPTER_A1_ADAPTER_A1_ADC_LTC2311_S00_AXI_BASEADDR 0x0123456789
#define XPAR_UZ_ANALOG_ADAPTER_A2_ADAPTER_A2_ADC_LTC2311_S00_AXI_BASEADDR 0x0123456789
#define XPAR_UZ_ANALOG_ADAPTER_A3_ADAPTER_A3_ADC_LTC2311_S00_AXI_BASEADDR 0x0123456789
In the
main.c - case init_ip_cores, comment out the Init-routines of the removed IP coresuz_adcLtc2311_ip_core_init();
PWM_3L_Initialize(&Global_Data); // three-level modulator
initialize_incremental_encoder_ipcore_on_D5(UZ_D5_INCREMENTAL_ENCODER_RESOLUTION, UZ_D5_MOTOR_POLE_PAIR_NUMBER);
In the
main.c - case init_gpios / uz_frontplane_button_and_led_init(), comment outenableAllMioWithLEDsAttached();
enableAllMioWithButtonsAttached();
Those pins cause the board to hang somehow if used, so disable the output from the PS-GPIO.
Inside the ISR, comment out
ReadAllADC();
update_speed_and_position_of_encoder_on_D5(&Global_Data);
PWM_3L_SetDutyCycle();
Comment out the Assertion in
uz / uz_GPIO / uz_gpio.cline 44. We disabled the Outputs from the PS-GPIO, so this assertion will fire!uz_assert( uz_gpio_get_enable_output(self) );
Fixing the Stop-Flag in
hw_init / uz_platform_state_machine.cline 277 to 0. With no PS-GPIO enabled, we can’t get any buttons.
Changes for the FreeRTOS-Project:
Delete ever CAN-related Code from the
main.cand remove the filescan.candcan.h.add a new define
#define OS_IS_FREERTOSin themain.h.Increase the DHCP-Timeout in the
main.c.if (mscnt >=DHCP_COARSE_TIMER_SECS * 2000)
“Hack” the LWIP-Stack of the BSP to handle the shared MDIO for the PS-PHY’s. The file is located under
\workspace\UltraZohm\psu_cortexa53_0\FreeRTOS_domain\bsp\psu_cortexa53_0\libsrc\lwip211_v1_8\src\contrib\ports\xilinx\netif\xemacpsif_physpeed.cInside the File
xemacpsif_physpeed.c, change line 291 to:for (phy_addr = 31; phy_addr >5; phy_addr--)
Manually add the Launch-configs. Copy the .launches-fils from the software-folder to
\workspace\.metadata\.plugins\org.eclipse.debug.core\.launches\
Restart Vitis to make the. launches-files accessible
Build both C-Projects
Control the Debug Configuration and run the project on the KR260.
Control the Debug Configuration - Application and Target Setup.
Debug Configuration - Application → Make sure the psu_cortexa53_0 for FreeRTOS and psu_cortexr5_0 for Baremetal are activated.
Debug Configuration - Target Setup → Check the Bitsream file for KR260. It should use newly generated bitsream, not UltraZohm file.
Check out the Vitis Serial Terminal output, and Open the JavaScope to see lifecheck signal.
Known Issues#
The applied BSP-Hack is done in generated source files. This means regenerating the BSP WILL DELETE THE HACK and the FreeRTOS won’t initialize the PHY properly. If the error “autonegation failed” show’s up during the start, check if the hack is still present.
- Vitis 2022.2 has known issues related with launching. You can use the referenced solution by Xilinx.
Discussion#
With this How-To it’s possible to port the UltraZohm-Framework to the KR260. Furthermore most steps and scripts could be also used for porting the Framework to other evaluation kits. The proposed flow is not finally finished and feedback is appreciated!
Some points and ideas for discussion on how the workflow could be better integrated into the main UltraZohm Project:
Use GEM 2 or 3 and route the Pins through the PL-part to use the PL-dedicated PHY’s? They’re not sharing a MDIO-Interface, so the BSP-hack should not be necessary!
Add a CAN-Interface and route the pins through the PL to an PMOD-connector, for example? So we don’t have to delete the CAN-related parts in the FreeRTOS-Project
How a define should look like to tell the C-Code it’s a KR260/KV260-Hil? With this define some actions can be done:
- Exclude some predefined IP cores from the Code?
Analog-IP’s
Encoder
…
- Exclude critical functions from calling
enableAllMioWithLEDsAttached();
enableAllMioWithButonsAttached();
ReadAllADC();
update_speed_and_position_of_encoder_on_D5(&Global_Data);
PWM_3L_SetDutyCycle();
uz_assert( uz_gpio_get_enable_output(self) );
Edit the
vitis_generate_UltraZohm_workspace.tclto work with the KR260.Enable an EMIO for one TTC to create a PWM-Signal to control the Fan of the SoM. Would perhaps also be an idea for the real UltraZohm?