Vitis HLS (HDL)#
Vitis HLS generates RTL from C and C++ code. It is useful for IP cores where the algorithm is easier to describe, test, or optimize in software than directly in HDL. The generated RTL can be packaged as an IP core, integrated in Vivado, and accessed from Vitis software through AXI drivers. Good starting point is User Guide 1399 - Introduction to Vitis HLS.
Compared with HDL Coder, Vitis HLS does not require modeling the algorithm as a Simulink data flow diagram. It is also well suited for floating-point logic and code-oriented design flows. Since MATLAB R2025b, Vitis HLS can also be used as a synthesis tool directly within MATLAB, see the MathWorks tutorial From MATLAB to Optimized RTL Using HDL Coder and AMD Vitis HLS for details.
Recommended workflow#
The fastest path is to keep the HLS project reproducible with a script.tcl file:
Create the C/C++ source, header, and test bench.
Run Vitis HLS from the Tcl script to simulate, synthesize, and export the IP.
Add the exported IP to the UltraZohm Vivado project.
Generate the bitstream, export the XSA, and update the Vitis workspace.
Use either the generated Vitis HLS driver or a UZ-style wrapper driver from the Baremetal software.
The manual GUI flow is included as an optional reference for learning the Vitis HLS project settings.
Tutorial#
This tutorial creates a simple IP core named uz_HLS_testIP.
The IP core multiplies two int32_t values and returns the result through an AXI-Lite interface.
The tutorial uses these files:
uz_HLS_testIP.cpp: HLS implementation.uz_HLS_testIP.h: HLS function declaration.tb_uz_HLS_testIP.cpp: C simulation test bench.testIP_solution/script.tcl: reproducible Vitis HLS project script.
Generate the HLS project with Tcl#
Each Vitis HLS design should be generated using a script.tcl.
The script captures the commands required to create, simulate, synthesize, and export the design.
The example script is in ultrazohm_sw\ip_cores\uz_HLS_testIP\testIP_solution\script.tcl:
############################################################
## Copyright 1986-2022 Xilinx, Inc. All Rights Reserved.
############################################################
open_project uz_HLS_testIP
set_top uz_HLS_testIP
add_files ./uz_HLS_testIP.cpp
add_files ./uz_HLS_testIP.h
add_files -tb ./tb_uz_HLS_testIP.cpp
open_solution "testIP_solution" -flow_target vivado
set_part {xczu9eg-ffvc900-1-e}
create_clock -period 10 -name default
config_export -format ip_catalog -rtl verilog
#source "./testIP_solution/directives.tcl"
csim_design
csynth_design
export_design -rtl verilog -format ip_catalog
The script adds the source and test bench files, sets the top function, selects the UltraZohm device, creates a 10 ns clock, runs C simulation, runs C synthesis, and exports the RTL as an IP catalog package.
The script can be extended with additional optimization and interface settings. For the available commands, see the Vitis HLS Command Reference Documentation. The following commands are examples and are not required for this tutorial:
config_interface -m_axi_addr64=0 -m_axi_alignment_byte_size 32 -m_axi_latency 64 -m_axi_max_bitwidth 32 -m_axi_max_widen_bitwidth 32
config_rtl -register_reset_num 3
config_array_partition -complete_threshold 2
config_compile -no_signed_zeros -unsafe_math_optimizations
Run the Tcl script
For this tutorial, the working directory is ip_cores\uz_HLS_testIP.
Run these commands in cmd.exe.
cd C:\path\to\ultrazohm_sw\ip_cores\uz_HLS_testIP
call "C:\Xilinx\Vitis_HLS\2022.2\settings64.bat"
vitis_hls -f testIP_solution\script.tcl
You only need the call "C:\Xilinx\Vitis_HLS\2022.2\settings64.bat" line if vitis_hls is not part of your PATH variable.
Adjust the Vitis HLS installation path if it is installed somewhere else.
The setup script only changes the environment of the shell in which it is executed.
After the script finishes, Vitis HLS creates the generated project in uz_HLS_testIP\ and exports the packaged IP to uz_HLS_testIP\testIP_solution\impl\export.zip.
The IP core can now be integrated into the Vivado project as described in Integrate the IP in Vivado.
Open the generated HLS project
To inspect the generated HLS project, open it with:
vitis_hls -p uz_HLS_testIP
Optional manual project setup#
The manual flow creates the same example project through the Vitis HLS GUI.
It is not required when the project is generated with script.tcl.
Use it when you want to inspect the project settings interactively or learn where the Tcl commands appear in the GUI.
Show manual GUI project creation steps
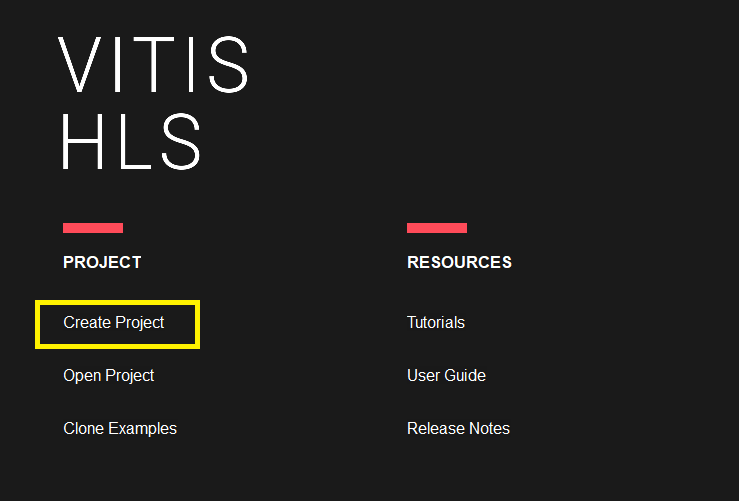
Start Vitis HLS (2022.2 used for this tutorial).
Create a new HLS Project.
In the Project Configuration window, locate the field for the project name and update it with
uz_HLS_testIP.
Note
In the pictures the project name is uz_axi_myTestIP. This was the name of the project before the tutorial was adjusted to uz_HLS_testIP. The steps are the same, only the project name is different.
Next, find the related path field in the Project Configuration window. Update the path to ensure that the project files are stored in the desired location.
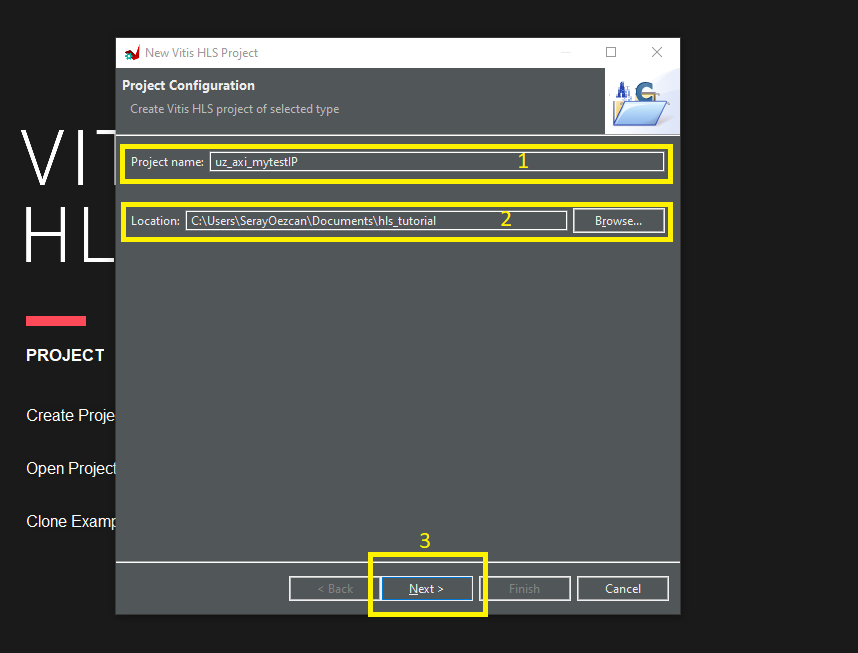
Click Next to proceed to the source and test bench file add sections.
These files will be added later in the tutorial.
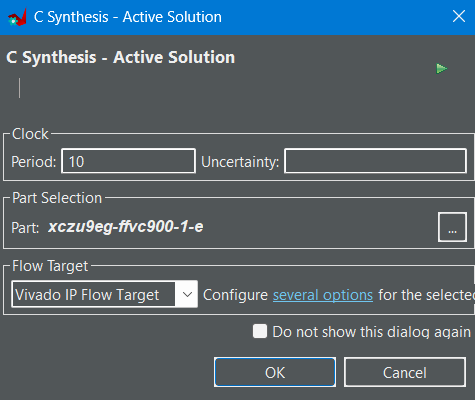
In the Solution Configuration section, you have the option to change the clock settings, board specification, and flow target.
Adjust the clock settings based on your project requirements. Specify the clock frequency, and any relevant parameters. Select the appropriate flow target for your project, such as generating a bitstream for FPGA programming or producing simulation files for software testing.
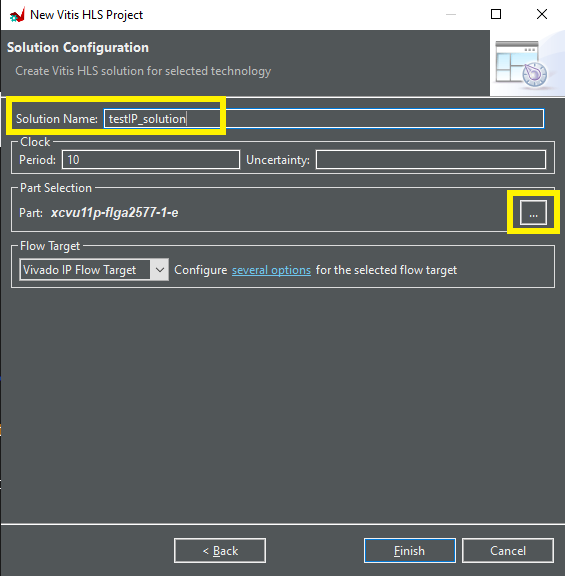
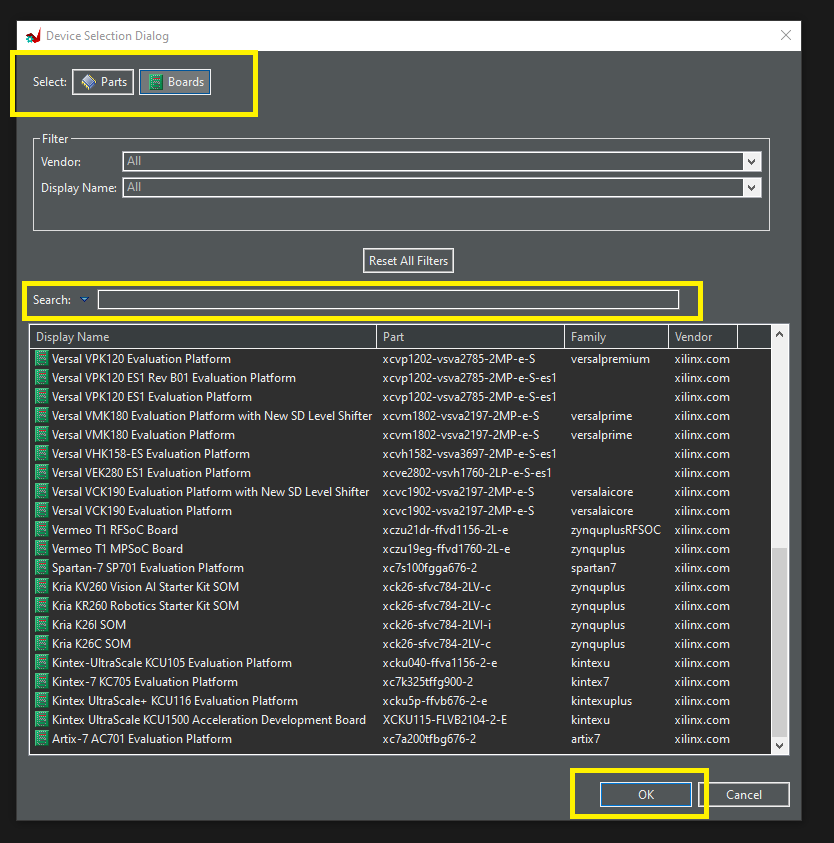
Modify the board specification if needed in future applications, ensuring compatibility between the design and the physical board you are using. When you click the Device Selection Dialog, you will see a list of all the available boards from the Xilinx Library. This dialog allows you to choose the specific board that matches your hardware setup and requirements.
For this tutorial, set the device to
xczu9eg-ffvc900-1-e.
After completing the configuration part, an empty project will be created. Now, for the basic test IP, we will implement integer multiplication and write the test bench.
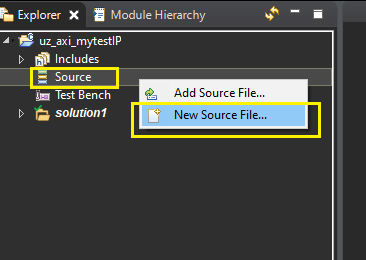
To create a source file, simply right-click on the Source folder in your project and choose New Source File… from the menu.
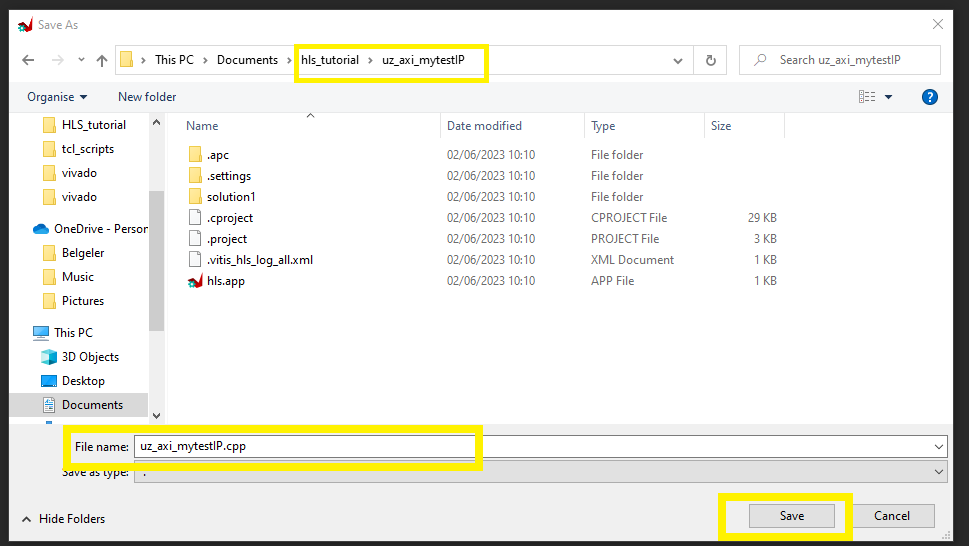
When the file window opens, make sure to check the path displayed. If the path is not the same as your project location, you should adjust it accordingly.
To create the new source file
uz_HLS_testIP.cpp, enter the filename in the file window and click Save, and write the code to the file.
#include <stdint.h>
#include "uz_HLS_testIP.h"

void uz_HLS_testIP(int32_t a, int32_t b, int32_t *result) {

   #pragma HLS INTERFACE ap_ctrl_none port=return
   #pragma HLS INTERFACE s_axilite port=a bundle=control
   #pragma HLS INTERFACE s_axilite port=b bundle=control
   #pragma HLS INTERFACE s_axilite port=result bundle=control

   *result = a * b;
}
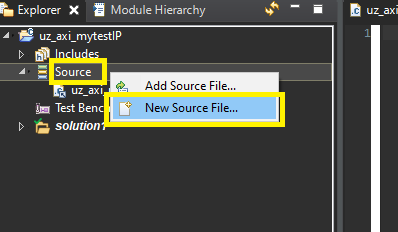
To create a header file, simply right-click on the Source folder in your project and choose New Source File… from the menu.
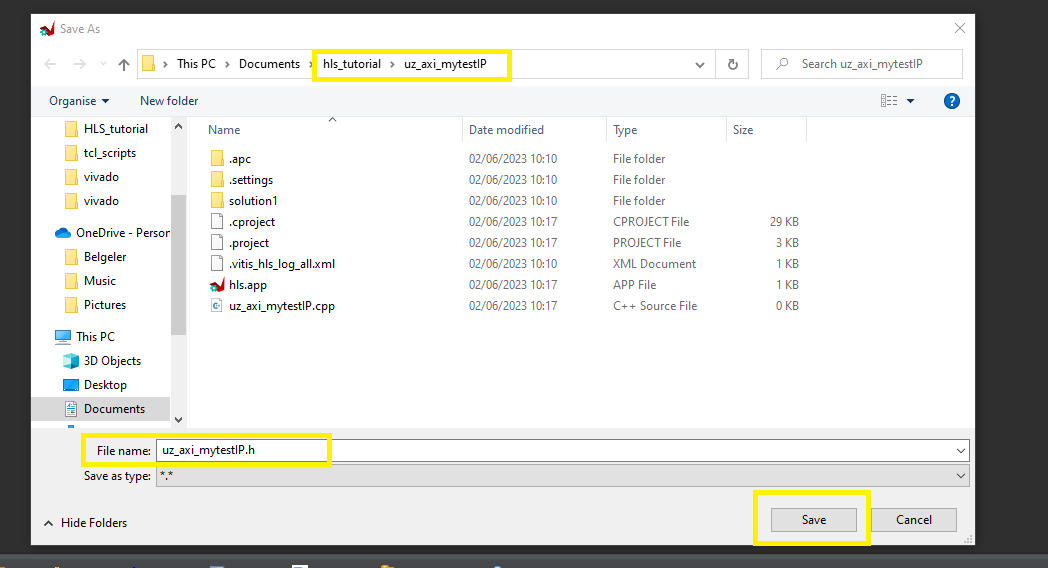
When the file window opens, make sure to check the path displayed. If the path is not the same as your project location, you should adjust it accordingly.
To create the new source file
uz_HLS_testIP.h, enter the filename in the file window and click Save, and write the code to the file.
void uz_HLS_testIP(int32_t a, int32_t b, int32_t *result);
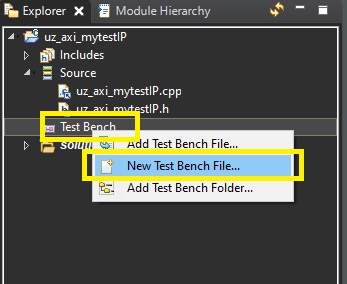
To create a test bench file, simply right-click on the Test Bench folder in your project and choose New Test Bench File… from the menu.
When the file window opens, make sure to check the path displayed. If the path is not the same as your project location, you should adjust it accordingly, and write the code to the file.
Create a new test bench file
tb_uz_HLS_testIP.cpp.The test bench calls the multiplication function with fixed input values and prints the result.
#include <stdio.h>
#include <stdint.h>

void uz_HLS_testIP(int32_t a, int32_t b, int32_t *result);

int main() {
   int32_t a = 5;
   int32_t b = 7;
   int32_t result;

   uz_HLS_testIP(a, b, &result);

   printf("Multiplication result: %d\n", result);

   return 0;
}
Simulate, synthesize, and export in the GUI#
This optional section shows the GUI equivalent of the simulation, synthesis, and export commands used by the Tcl script. Open the generated HLS project in the GUI when you want to modify directives interactively, inspect synthesis reports, or review resource and timing estimates. If the Tcl script already completed successfully and you do not need to inspect the HLS project, continue with Integrate the IP in Vivado.
Show GUI steps to edit directives, run synthesis, and export RTL
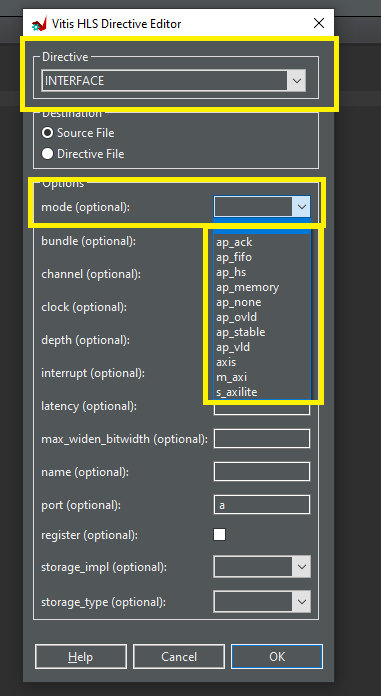
HLS pragmas configure interfaces, scheduling, resource mapping, and other synthesis behavior. The example source uses
#pragma HLS INTERFACEto create AXI-Lite registers fora,b, andresult. See the Vitis HLS Pragmas documentation for the available pragmas.Pragmas can be written directly in the source code or added through the Directive view in Vitis HLS.

Open the directive editor to add or modify directives without editing the source code manually.
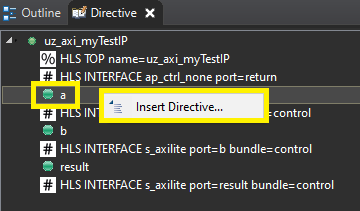
For example, right-click a variable such as
ato configure its interface pragma.
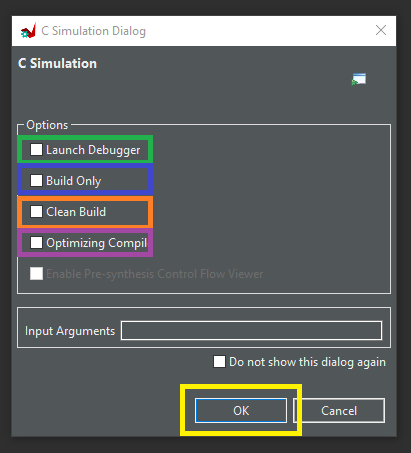
Run C Simulation to compile and execute the test bench before synthesis.
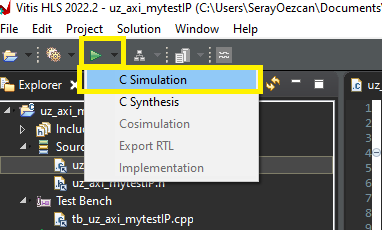
The simulation dialog provides options for debug, clean build, and optimization. The default settings are sufficient for this tutorial.
Check the console output or log file after simulation. A successful run means the C implementation and test bench compile and execute without errors.
Before synthesis, configure the top function of the design.
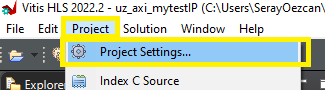
Open the synthesis settings in the project settings.
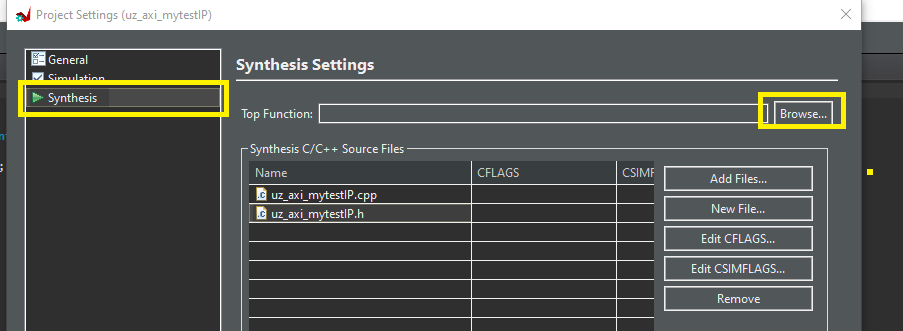
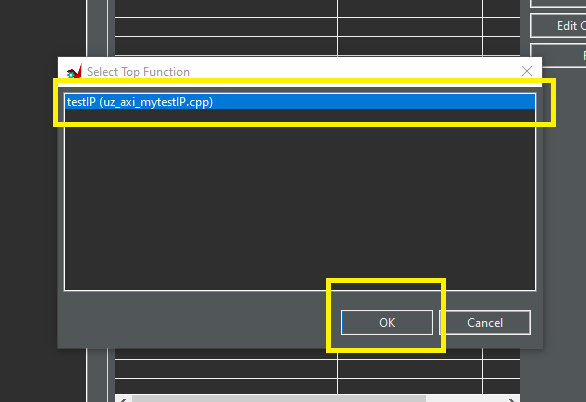
Select
uz_HLS_testIPas the top function.
Run C Synthesis. Synthesis converts the C/C++ implementation into RTL and reports estimated resource usage and timing. The estimated resource usage is usually higher than the final Vivado synthesis result, except for DSP slices and I/O pins.
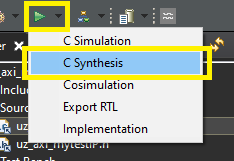
Keep the default synthesis settings for this tutorial. Adjust them only when the design requires different clock, interface, or optimization constraints.
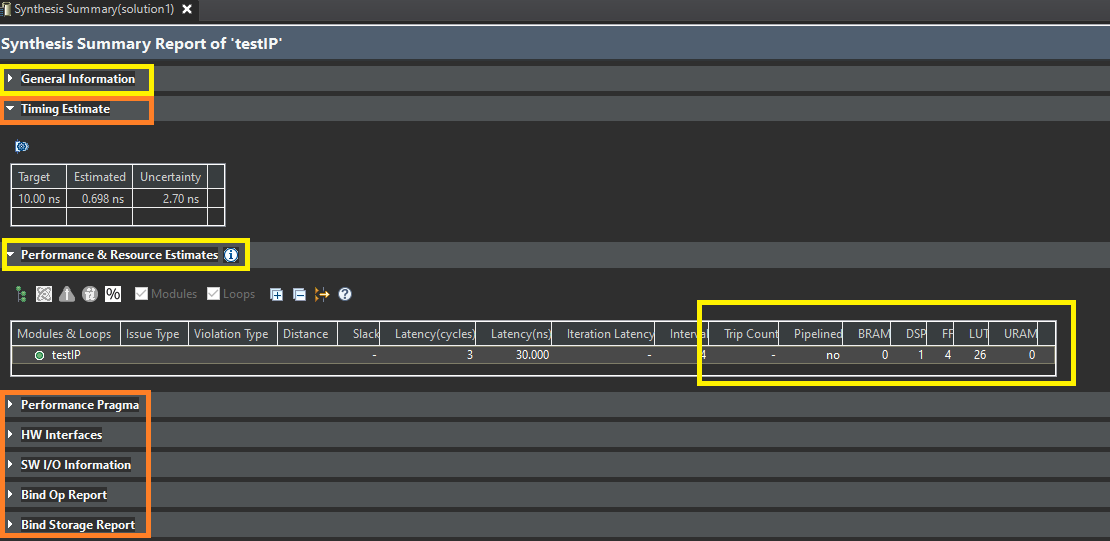
Review the Summary Report after synthesis. It shows resource estimates, timing information, and other synthesis results.
Click Export RTL to package the synthesized design.
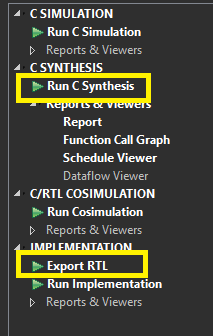
Export the IP for integration in Vivado.
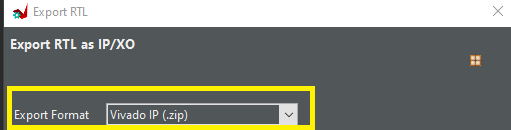
At the end of the export step, Vitis HLS creates the IP core as a
.zipfile. Unzip it and place it in theultrazohm_sw\ip_coresfolder.
Integrate the IP in Vivado#
To use the new IP core in the UZ Vivado project, the generated IP core has to be placed in the
ultrazohm_sw\ip_coresfolder. After following Generate the HLS project with Tcl, this is already the case. If the IP core was generated in a different project directory, move it toultrazohm_sw\ip_coresby unzipping the exported.zipfile.Open Vivado and the block design.
Navigate to
Window->IP-Catalogandright-click->Refresh All Repository.Extend
uz_usersubblock.Extend the smartconnect by one master port to connect AXI ports to the processor.
Add the new IP core and connect it to the system.
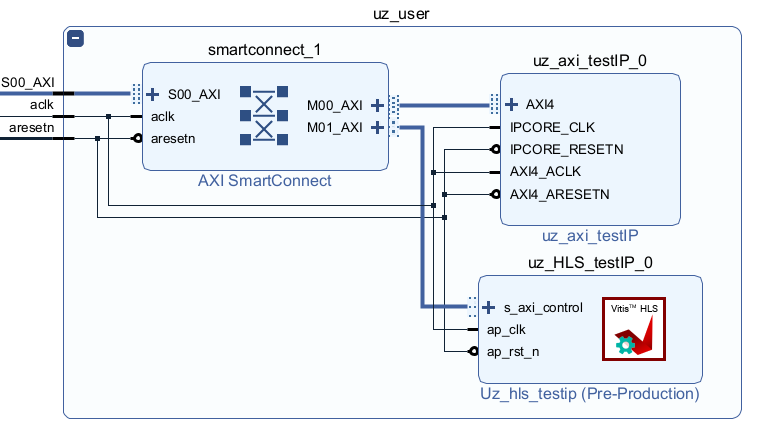
Go to the Address editor and assign a base address to the new IP core.
For video implementation of these steps, check out the last step of HDL Coder (HDL).
Build the bitstream, export the XSA, and update the Vitis workspace as done in Generate the Bitstream with Vivado.
Use the IP core from Vitis#
Generated drivers#
Vitis HLS generates AXI driver files for the exported IP core. Use these generated drivers for quick tests. For production code in the UltraZohm software structure, prefer a small UZ-style wrapper driver around the hardware access, as shown in the next section.
The generated driver files for uz_HLS_testIP are:
xuz_hls_testip_hw.h
xuz_hls_testip_linux.c
xuz_hls_testip_sinit.c
xuz_hls_testip.c
xuz_hls_testip.h
The _hw.h file contains register offsets and low-level definitions.
The xuz_hls_testip.c and xuz_hls_testip.h files provide the initialization, setter, and getter functions used by software.
Vivado includes these generated drivers in the exported XSA, and Vitis imports them into the platform project after the workspace is regenerated.
They can be found under ultrazohm_sw\vitis\workspace\UltraZohm\hw\drivers\your_ip_core.
Initialization with Vitis HLS generated drivers#
To initialize an IP core instance, include the generated header and use the device ID from xparameters.h.
The device ID is generated from the Vivado block design and becomes available after the XSA has been exported and the Vitis workspace has been updated.
#include <xuz_hls_testip.h>

XUz_hls_testip XUz_hls_testip_instance;

int main(void) {
   XUz_hls_testip_Initialize(&XUz_hls_testip_instance, XPAR_UZ_USER_UZ_HLS_TESTIP_0_DEVICE_ID);
}
Usage of Vitis HLS generated drivers#
After initialization, use the generated setter and getter functions to write input registers and read output registers.
For a quick test, the generated driver can be used directly from main or from the init_ip_cores case:
XUz_hls_testip XUz_hls_testip_instance;
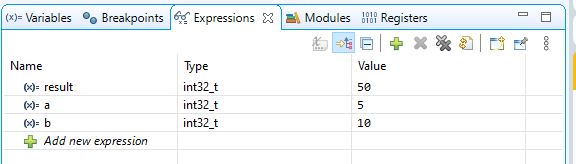
int32_t a = 5;
int32_t b = 10;
int32_t result = 0;
int main(void) {
XUz_hls_testip_Initialize(&XUz_hls_testip_instance, XPAR_UZ_USER_UZ_HLS_TESTIP_0_DEVICE_ID);
XUz_hls_testip_Set_a(&XUz_hls_testip_instance, a);
XUz_hls_testip_Set_b(&XUz_hls_testip_instance, b);
result = XUz_hls_testip_Get_result(&XUz_hls_testip_instance);
uz_printf("The result of multiplication is %d\r\n", result);
}
Note
Using the AXI-write and -read functions is more tricky depending on the desired datatype.
In the following example snippet the AXI-interfaces have a floating point datatype.
However, the data for the AXI-write functions takes an argument of type uint32.
This means, the driver expects the bits of a floating point value in the storage item of an unsigned int.
To achieve this, the user can create the really used float variable, here REAL_VAR and create a pointer of type uint32_t to this variable and cast it.
The AXI-set function is called with the dereferenced, casted pointer, which gives the current value of the REAL_VAR to the driver.
float REAL_VAR = 0.0f;
uint32_t* INT_VAR = (uint32_t*)&REAL_VAR;

int main(void) {
   XEXAMPLE_Initialize(&example_instance, XPAR_EXAMPLE_0_DEVICE_ID);
   XEXAMPLE_Set_axi_example_signal(&example_instance, *INT_VAR);
}
Optional UZ-style driver#
The driver is already provided in ultrazohm_sw/software/Baremetal/src/IP_Cores/uz_HLS_testIP.
To gain a better understanding of driver creation, you can follow the steps below to create a driver for the IP core yourself.
Show steps (collapsed by default)
The detailed explanation for AXI test IP created with HDL Coder can be found here.
This HLS IP scenario is similar to the example. To multiply two variables result=A⋅B of type int32_t, the driver has to write A and B from the PS to the PL by AXI in the correct registers and read back the result from the PL to the PS.
For that reason, we need set and get functions, also called write and read functions.
Create
uz_HLS_testIPfolder and move toultrazohm_sw -> software -> Baremetal -> src -> IP_CoresIn the folder, create the files:
uz_HLS_testIP.cuz_HLS_testIP.huz_HLS_testIP_hw.cuz_HLS_testIP_hw.huz_HLS_testIP_hwAddresses.h
 1#include "uz_HLS_testIP_hw.h"
 2#include "uz_HLS_testIP_hwAddresses.h"
 3#include "../../uz/uz_AXI.h"
 4
 5void uz_HLS_testIP_hw_write_A(uint32_t base_address,int32_t A){
 6   uz_assert_not_zero_uint32(base_address);
 7   uz_axi_write_int32(base_address+XUZ_HLS_TESTIP_CONTROL_ADDR_A_DATA,A);
 8}
 9
10void uz_HLS_testIP_hw_write_B(uint32_t base_address,int32_t B){
11   uz_assert_not_zero_uint32(base_address);
12   uz_axi_write_int32(base_address+XUZ_HLS_TESTIP_CONTROL_ADDR_B_DATA,B);
13}
14
15int32_t uz_HLS_testIP_hw_read_result(uint32_t base_address){
16   uz_assert_not_zero_uint32(base_address);
17   return (uz_axi_read_int32(base_address+XUZ_HLS_TESTIP_CONTROL_ADDR_RESULT_DATA));
18}
1#ifndef UZ_HLS_TESTIP_HW_H
2#define UZ_HLS_TESTIP_HW_H
3#include <stdint.h>
4
5void uz_HLS_testIP_hw_write_A(uint32_t base_address,int32_t A);
6void uz_HLS_testIP_hw_write_B(uint32_t base_address,int32_t B);
7int32_t uz_HLS_testIP_hw_read_result(uint32_t base_address);
8
9#endif // UZ_HLS_TESTIP_HW_H
 1#ifndef UZ_HLS_TESTIP_HWADDRESSES_H
 2#define UZ_HLS_TESTIP_HWADDRESSES_H
 3
 4#define XUZ_HLS_TESTIP_CONTROL_ADDR_A_DATA      0x10
 5#define XUZ_HLS_TESTIP_CONTROL_BITS_A_DATA      32
 6#define XUZ_HLS_TESTIP_CONTROL_ADDR_B_DATA      0x18
 7#define XUZ_HLS_TESTIP_CONTROL_BITS_B_DATA      32
 8#define XUZ_HLS_TESTIP_CONTROL_ADDR_RESULT_DATA 0x20
 9#define XUZ_HLS_TESTIP_CONTROL_BITS_RESULT_DATA 32
10#define XUZ_HLS_TESTIP_CONTROL_ADDR_RESULT_CTRL 0x24
11
12#endif // UZ_HLS_TESTIP_HWADDRESSES_H
 1#include "../../uz/uz_global_configuration.h"
 2#if UZ_HLS_TESTIP_MAX_INSTANCES > 0U
 3#include <stdbool.h>
 4#include "../../uz/uz_HAL.h"
 5#include "uz_HLS_testIP.h"
 6#include "uz_HLS_testIP_hw.h"
 7
 8struct uz_HLS_testIP {
 9   bool is_ready;
10   struct uz_HLS_testIP_config_t config;
11};
12
13static uint32_t instance_counter = 0U;
14static uz_HLS_testIP instances[UZ_HLS_TESTIP_MAX_INSTANCES] = { 0 };
15
16static uz_HLS_testIP* uz_HLS_testIP_allocation(void);
17
18static uz_HLS_testIP* uz_HLS_testIP_allocation(void){
19   uz_assert(instance_counter < UZ_HLS_TESTIP_MAX_INSTANCES);
20   uz_HLS_testIP* self = &instances[instance_counter];
21   uz_assert_false(self->is_ready);
22   instance_counter++;
23   self->is_ready = true;
24   return (self);
25}
26
27uz_HLS_testIP* uz_HLS_testIP_init(struct uz_HLS_testIP_config_t config) {
28   uz_HLS_testIP* self = uz_HLS_testIP_allocation();
29   self->config = config;
30   return (self);
31}
32
33int32_t uz_HLS_testIP_multiply(uz_HLS_testIP* self, int32_t A, int32_t B){
34   uz_assert_not_NULL(self);
35   uz_assert(self->is_ready);
36   uz_HLS_testIP_hw_write_A(self->config.base_address,A);
37   uz_HLS_testIP_hw_write_B(self->config.base_address,B);
38   return (uz_HLS_testIP_hw_read_result(self->config.base_address));
39}
40#endif
 1#ifndef UZ_HLS_TESTIP_H
 2#define UZ_HLS_TESTIP_H
 3#include <stdint.h>
 4
 5/**
 6* @brief Data type for object uz_HLS_testIP
 7*
 8*/
 9typedef struct uz_HLS_testIP uz_HLS_testIP;
10
11/**
12* @brief Configuration struct for myTestIP
13*
14*/
15struct uz_HLS_testIP_config_t{
16   uint32_t base_address; /**< Base address of the IP-Core */
17   uint32_t ip_clk_frequency_Hz; /**< Clock frequency of the IP-Core */
18};
19
20/**
21* @brief Initializes an instance of the myTestIP driver
22*
23* @param config Configuration values for the IP-Core
24* @return Pointer to initialized instance
25*/
26uz_HLS_testIP* uz_HLS_testIP_init(struct uz_HLS_testIP_config_t config);
27
28/**
29* @brief Calculates result=A*B
30*
31* @param self Pointer to IP-Core instance that was initialized with init function
32* @param A First factor
33* @param B Second factor
34* @return Product of A times B
35*/
36int32_t uz_HLS_testIP_multiply(uz_HLS_testIP* self, int32_t A, int32_t B);
37
38#endif // UZ_HLS_TESTIP_H
Open
uz_global_configuration.hand add#define UZ_HLS_TESTIP_MAX_INSTANCES 0Uto the normal configuration section and#define UZ_HLS_TESTIP_MAX_INSTANCES 20Uto the test configuration section.For the unit tests navigate to
vitis/software/Baremetal/test/IP_Coresand create the folderuz_HLS_testIP.Within this folder create the file
test_uz_HLS_testIP.candtest_uz_HLS_testIP_hw.c.
 1#include "unity.h"
 2#include "uz_HLS_testIP_hw.h"
 3#include <stdbool.h>
 4#include <stdint.h>
 5#include "test_assert_with_exception.h"
 6#include "mock_uz_AXI.h" // Tells Ceedling to create mock versions of the functions in uz_AXI (e.g., _Expect)
 7#include "uz_HLS_testIP_hwAddresses.h"
 8
 9#define BASE_ADDRESS 0x0F0000000U // random hex value that represents a fictional base address
10#define ZERO_BASE_ADDRESS 0x00000000U
11
12
13void test_uz_HLS_testIP_hw_write_A_base_address_zero(void) {
14	TEST_ASSERT_FAIL_ASSERT(uz_HLS_testIP_hw_write_A(ZERO_BASE_ADDRESS, 10));
15}
16
17void test_uz_HLS_testIP_hw_write_B_base_address_zero(void) {
18	TEST_ASSERT_FAIL_ASSERT(uz_HLS_testIP_hw_write_B(ZERO_BASE_ADDRESS, 10));
19}
20
21void test_uz_HLS_testIP_hw_read_result_base_address_zero(void) {
22	TEST_ASSERT_FAIL_ASSERT(uz_HLS_testIP_hw_read_result(ZERO_BASE_ADDRESS));
23}
24
25void test_uz_HLS_testIP_hw_write_A(void) {
26	int32_t testvalue = 10;
27	uz_axi_write_int32_Expect(BASE_ADDRESS + XUZ_HLS_TESTIP_CONTROL_ADDR_A_DATA, testvalue);
28	uz_HLS_testIP_hw_write_A(BASE_ADDRESS, testvalue);
29}
30
31void test_uz_HLS_testIP_hw_write_B(void) {
32	int32_t testvalue = 10;
33	uz_axi_write_int32_Expect(BASE_ADDRESS + XUZ_HLS_TESTIP_CONTROL_ADDR_B_DATA, testvalue);
34	uz_HLS_testIP_hw_write_B(BASE_ADDRESS, testvalue);
35}
36
37void test_uz_HLS_testIP_hw_read_result(void) {
38	int32_t expected_result = 42;
39	uz_axi_read_int32_ExpectAndReturn(BASE_ADDRESS + XUZ_HLS_TESTIP_CONTROL_ADDR_RESULT_DATA, expected_result);
40	uz_HLS_testIP_hw_read_result(BASE_ADDRESS);
41}
 1#ifdef TEST
 2
 3#include "unity.h"
 4#include "uz_HLS_testIP.h"
 5#include "mock_uz_HLS_testIP_hw.h"
 6#include "test_assert_with_exception.h"
 7
 8#define TEST_BASE_ADDRESS 0x000F0000
 9
10uz_HLS_testIP* successful_init(void);
11uz_HLS_testIP* successful_init(void) {
12	struct uz_HLS_testIP_config_t config = {
13		.base_address = TEST_BASE_ADDRESS,
14		.ip_clk_frequency_Hz = 100000000U};
15	uz_HLS_testIP* instance = uz_HLS_testIP_init(config);
16	return(instance);
17}
18
19void test_uz_HLS_testIP_init_successful(void) {
20	successful_init();
21}
22
23void test_uz_HLS_testIP_multiply_assert_NULL(void) {
24	TEST_ASSERT_FAIL_ASSERT(uz_HLS_testIP_multiply(NULL, 5, 10));
25}
26
27void test_uz_HLS_testIP_multiply(void) {
28	uz_HLS_testIP* instance = successful_init();
29	uz_HLS_testIP_hw_write_A_Expect(TEST_BASE_ADDRESS, 5);
30	uz_HLS_testIP_hw_write_B_Expect(TEST_BASE_ADDRESS, 10);
31	uz_HLS_testIP_hw_read_result_ExpectAndReturn(TEST_BASE_ADDRESS, 50);
32	int32_t result = uz_HLS_testIP_multiply(instance, 5, 10);
33	TEST_ASSERT_EQUAL_INT32(50, result);
34}
35
36#endif // TEST
Test on hardware with the Vitis Serial Terminal#
Create the file
uz_myHLSIP.hin theincludefolder.
1#pragma once
2
3void uz_myHLSIP(void);
Create the file
uz_myHLSIP.cin theswfolder.
 1#include "../include/uz_myHLSIP.h"
 2#include "../uz/uz_HAL.h"
 3#include "../IP_Cores/uz_HLS_testIP/uz_HLS_testIP.h"
 4#include "xparameters.h"
 5
 6void uz_myHLSIP(void){
 7   struct uz_HLS_testIP_config_t config={
 8         .base_address= XPAR_UZ_USER_UZ_HLS_TESTIP_0_S_AXI_CONTROL_BASEADDR,
 9         .ip_clk_frequency_Hz=100000000U
10   };
11   uz_HLS_testIP *instance = uz_HLS_testIP_init(config);
12   int32_t a = 5;
13   int32_t b = 10;
14   int32_t c = uz_HLS_testIP_multiply(instance, a, b);
15   uz_printf("Hardware multiply: %i, Software multiply: %i\n", c, a*b);
16   if (c==a*b){
17      uz_printf("Success: hardware and software multiply are equal! \n");
18   }else{
19      uz_printf("Fail: hardware and software multiply are NOT equal! \n");
20   }
21
22   while(1){
23      // do nothing and loop forever
24   }
25}
Open
uz_global_configuration.hand increase#define UZ_HLS_TESTIP_MAX_INSTANCESto1U.Build the software.
Include
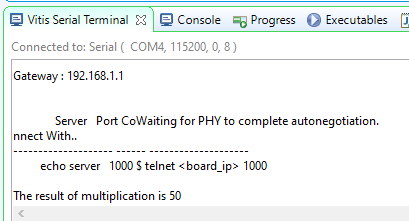
#include "include/uz_myHLSIP.h"inmain.c(Baremetal R5) and calluz_myHLSIP();before the ISR is initialized!Connect the serial port to the Vitis Serial Terminal.
Run the program. The success message should be printed to the Vitis Serial Terminal.
More complex HLS use cases#
The uz_HLS_testIP example is intentionally small and shows the mechanics of generating, exporting, integrating, and driving a Vitis HLS IP core.
For more complex HLS-based IP cores, see the following examples.
Neural network accelerator#
The uz_NN_acc IP core implements a configurable floating-point MLP accelerator and shows additional topics that are relevant for larger HLS designs:
multiple C/C++ source files and reusable layer functions,
multiple Vitis HLS solutions with separate
script.tclanddirectives.tclfiles,HLS directives for performance and resource tradeoffs,
AXI-Lite control together with memory access from the programmable logic,
a UZ-style software driver for integrating the accelerator into the UltraZohm software stack.
The number of layers and neurons is fixed during HLS synthesis. Changing the network structure therefore requires resynthesizing the IP core, as described in Customize IP core.
FCS-MPC with prediction horizon one#
Another HLS example is a finite-control-set model predictive control (FCS-MPC) implementation with prediction horizon one.
This use case is currently developed on the remote branch origin/feature/fcs_mpc_n1 and is not part of develop yet.
The branch contains the HLS source files under ip_cores/fcs_mpc_n1.
Compared with uz_HLS_testIP, the FCS-MPC example is useful for studying an HLS design that is closer to a real control algorithm:
prediction of candidate switching states,
cost-function evaluation in hardware,
selection of the optimal switching state within a fixed control cycle,
AXI-Lite control together with AXI-Stream inputs and direct
ap_noneoutputs,integration of controller logic as an IP core in the FPGA fabric,
C simulation, C synthesis, co-simulation, and VHDL IP export from one
script.tcl.
Once the branch is merged, this section should be extended with links to the generated IP core, its HLS script.tcl, and the corresponding software driver.